


Walk through of Unity Viking Demo
This demo is the modified version of Viking Demo created for AppWarp Cloud engine which is discussed here. This version of demo uses AppWarp S2 SDK.
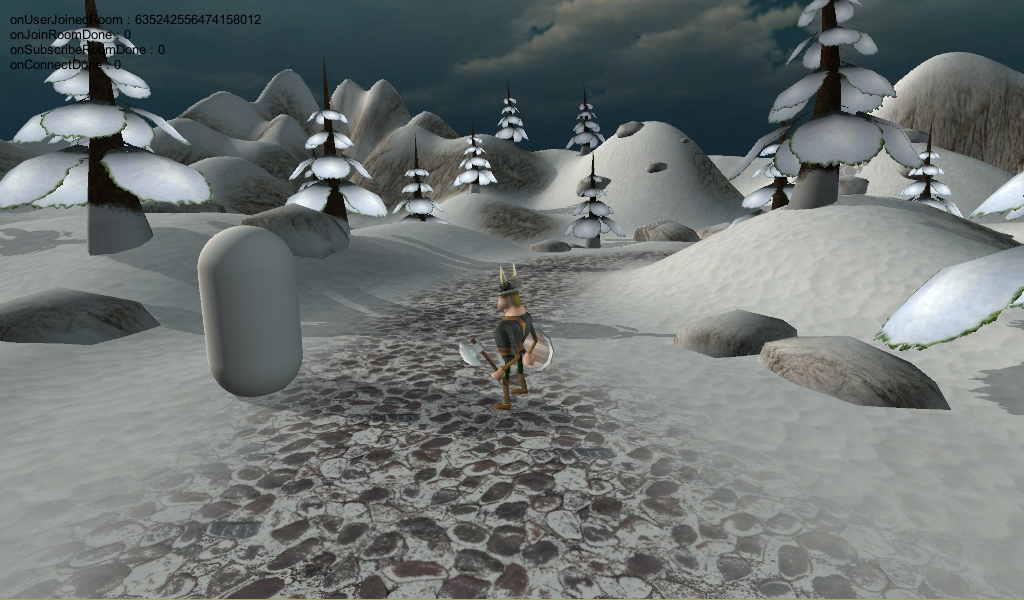
Like the original demo, there is a small world covered in snow, here players play as viking and can move around in the world. But this version of demo has one more extra character, a simple cylindrical structure. The cylinder moves on a linear path repeatedly. The path is defined by the server. The cylinder is created and moved on server. The clients gets the real time updates about the position of cylinder and then updates the cylinder on their front-ends.
The sample with source code (server side as well as Unity client side) is available in the samples section of our download page
Server Side
To run this server side application, please first go through Running your first application. You need to follow the same steps for this sample as well. Following are details specific to this sample.
The Server side is written in Java using AppWarp S2 SDK. We have implemented, three adapters one for server, one for zone and one for room. Server Adapter is the one which handles the main server requests, whereas zone and room adapters handle requests specific to zone and room they are attached to.
We have created a Special class named Robot defined in Robot.java, which handles the movement of our cylinder on server side. Another class named Vertex3f has been defined in Vertex3f.java. Vertex3f is used to represent a 3d point.
The Robot class loops in a linear path. The linear path is defined by a start and end points. These start and end points are instances of Vertex3f class. Our robot only move in X direction. Other than start and end point, a current point is also defined which represent the current location of robot. Using the start point and end point, and the moving direction, we update the current location. ‘step’ is the displacement to be performed between two consecutive points in the linear path.
    public void moveStepX()
    {
        if(direction == 0)
        {
            if(current.x < end.x)
            {
                current.x += step;
            }
            else
            {
                direction = 1;
            }
        }
        else if(direction == 1)
        {
            if(current.x > start.x)
            {
                current.x -= step;
            }
            else
            {
                direction = 0;
            }
        }
    }
In our room adapter, at handleTimerTick(), we simply call the moveStepX() function of our robot and send the new position in JSON format. The JSON message contains, x,y, and z values of current position of robot.
    public void handleTimerTick(long time) {
        bot.moveStepX();
        Vector3f pos = bot.getPosition();
        //Get the current position of robot and send it to all clients
        JSONObject tobeSent = new JSONObject();
        try
        {
            tobeSent.put("x",pos.x);
            tobeSent.put("y",pos.y);
            tobeSent.put("z",pos.z);
        }
        catch(JSONException ex)
        {
        }

        m_room.BroadcastChat("robot", tobeSent.toString());
    }
Client Side
For client side, most of the logic is same as the original AppWarp Cloud Viking Demo. The unity demo has been slightly modified to show the robot moving. To keep things simple, we are using a cylindrical shaped model to represent the robot.
Also, the AppWarp S2 does not secret key, instead you need to specify the address of your server. 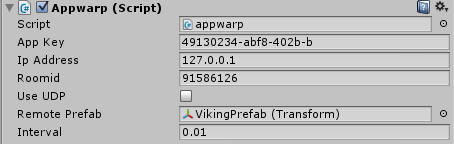
When ever a chat message is received, we parse it to find the x,y, and z position of robot and set it to the cylinder in our scene. The cylinder has been named as robot.
        if(sender == "robot")
        {
            GameObject remote;
            remote = GameObject.Find(sender);
            com.shephertz.app42.gaming.multiplayer.client.SimpleJSON.JSONNode json = com.shephertz.app42.gaming.multiplayer.client.SimpleJSON.JSON.Parse(msg);
            //remote.transform.position = new Vector3(float.Parse(json["x"]), float.Parse(json["y"]), float.Parse(json["z"]));
            ServerSmooth ss = remote.GetComponent();
            ss.SetTransform(new Vector3(float.Parse(json["x"]), float.Parse(json["y"]), float.Parse(json["z"])));
        }
Here we first check if the sender is robot or not. If the sender is robot i.e. the server, we find the object in our scene i.e. the cylinder and update its position with new x,y, and z.
To make movement smooth, we have defined an additional component in our client, ServerSmooth , which have been already applied to cylinder. So, we simply get this component and set transform. SetTransform() uses Vector.Lerp to make movement smooth.
transform.position = Vector3.Lerp(transform.position, position, Time.deltaTime);